| Brief |
Produce an approriately designed 'info-pack' of things to know, consider or remember in order to produce successful Design for Print. You should use the seminars and tasks from the module as a starting point for your own individual/independent investigation of the methods, processes and formats that can be used to create innovative but practical solutions to print based design briefs and all aspects of print- based delivery.
For submission and assessment you will also be required to select, summarise and evaluate appropriate primary & secondary source material and submit it in an appropriately designed and produce graphic format that reflects your cretaive and technical appreciation of graphic design. Your submission should demonstrate your understanding of print processes, conventions and creative options from the perspective of a graphic designer. It should also demonstrates your ability to effectively organise and present a body information in a designed format. As well as presenting your resolution you should upload a multi page pdf version to your Design Practice & Design Context blog via 'Issuu'. See additional briefings for further information.
|
| Background / Considerations |
You are graphic designers, everything you produce should be designed, considered and effective. You need to be in complete control, even if it's carefully arranged to look casual! Don't ignore your knowledge of layout but expand upon it! The content should be ordered and informative with clear example of what you mean, the style your own, derived from the study of the work of other designers.
Commercial print processes are of concern to you especially as, at times, you will have to relinquish the hands –on production control of your work for a more specification/managerial role.
|
Research
I started off my research by completing a task set in one of the studio sessions - answering my own questions about print. I felt that this would help me get the ball rolling in my ideas and concepts if I knew what was available to me in terms of printing methods ( I haven't included some of the questions because I answered them through further research which is documented below):
- How do you print onto a 3D object? (the stress ball, the hair clay tin)
I could
- How do you add spot varnish / gloss to something?
- How do you print onto credit cards?
- How can you mass print neon colours (ie digitally, how is it possible?)
- How much does it cost to emboss something? to foil something? to gloss something?
- How can you achieve foiling more professionally?
- How do you print onto napkins?
- How do you print white onto black stock?
Because I fell ill the first week of this studio brief - I got off to a slow start. I started by discussing printing methods with my dad (who works for a printers) and starting to list a range of print methods that I could try out or incorporate into my design.
He gave me this mini printing catalogue that showcases loads of different techniques:
Because these print methods are normally printed on large print runs, it will be really costly to use them in just one print manual and so I attempted to think of ways I can recreate these print methods using resources I could get my hands on.
I also did quite a bit of research into looking how and where to source even the most obscure of print methods, to make the ultimate guide to design for print.
There were a lot of different methods and finishes, but I was most interested in the different textures:
Matt OPP lamination
'Our standard matt film, with a smooth feel and a deep matt finish. Suitable for subsequent UV varnishing. Approved for food contact.'
Fine Linen textured lamination
'A very tough film especially suitable for file covers and case-bound covers, this embossed film has very high initial tear resistance'
Spot UV varnish
I thought it was really nice to combine different textures, too.
There were a lot of finishing methods, such as:
250 Micron matt encapsulation
I really like the interactivity of some of the print methods:
Remoist Gum
Rub remove latex
Heat to reveal ink
Thermo-chromatic ink reacts to different temperatures. After speaking to Alan from Lancashire Laminators (company who created the catalogue) he explained that the thermo-chromatic ink is added to the design last using a silk screen..
After looking at the availability of thermo-chromatic ink online, I decided to order some!
The catalog shows the contact number for the company that can do all of these methods.
Looking at these really got me thinking about other interactivity methods I could use with print products...
Edible print (sugar paper)
Printing onto icing
And made me think about more obscure effects that will make my manual the most interesting:
Engraving
Embossing/ Debossing
Laser cutting
Letterpress
Foiling
I really love the idea of using metallic inks / foiling on matte stock, as the effect is very rewarding. Here are some examples of foiling:


A video I found on YouTube shows clearly how a foiling machine works in industry, and automatically applies both glue and foil with nearly no human interaction.
Me and Danielle Harrison had a go at professional foiling - we tried a few different colours of foil and stock.
We had to create a screen as if we were going to screen print but instead of using ink, we used glue instead. This meant that the desired foiling area was sticky. We then placed the foil face up on top of the glue, sandwiched the sheet between layers of newsprint to incubate it, and then pressed it under the heat press for 12 seconds at 160 degrees.


I think the outcome was very successful. We found that foiling works well with even very small print, but the screen needs to be intricately exposed and successful in order for the final transfer to be successful.
Flocking
Along with foiling, me and Danielle also tried a bit of flocking. Flocking is the art of transferring felt onto a design. It is a very similar process to foiling, in that in the final stages, rather than placing the flocking material face up like foil, you lay in face down on top of the glue design.
The design with the flocking material is also pressed under the heat press for 20 seconds at 170 degrees.


I really love the texture of the final design - I think it has the interactivity that best displays the effects of design for print.
Gilding
I really love the effect of gilding as it makes the design look much more luxurious. A tight vice is needed to clamp the pages as tight as possible so that the gold does not seep down into the book itself, but only on the edges.
In this video a sheet of gold is used. In other methods, gold leaf dust has been used which I have been told by Andy at Vernon Street campus is also good to use. Lots of videos explain that you can use gold spray can but this makes the pages stick together and is not for functional use.
Fore Edge printing
Fore edge printing is a more modern version of a popular decoration choice of the 1700 & 1800s. It involves transferring an image onto the edge of the pages of a book rather than just the spine. Traditionally, the images are painted by hand and not printed. But this is design for print - there must be a way!
Some examples of fore-edge printing:


It's very similar to gilding in that it is printing directly onto the edges of the pages.
This video I found on YouTube displays well the process. In this case the words are not painted but printed using a silk screen.
I really love the final outcome as it displays the more traditional methods of physical paper and design for print which I think would be really nice to include in my final design if I were to do an actual book.
Coloured and White ink onto black paper
Using metallic paper to create symmetrical, mirrored designs
Different surfaces like glass and tin and tetra pak
Printing onto wood
Printing onto material
Making a wax stamp (printing with wax)
Then different methods and their outcomes:
Lino printing
3d Pinting
How do you achieve this?!
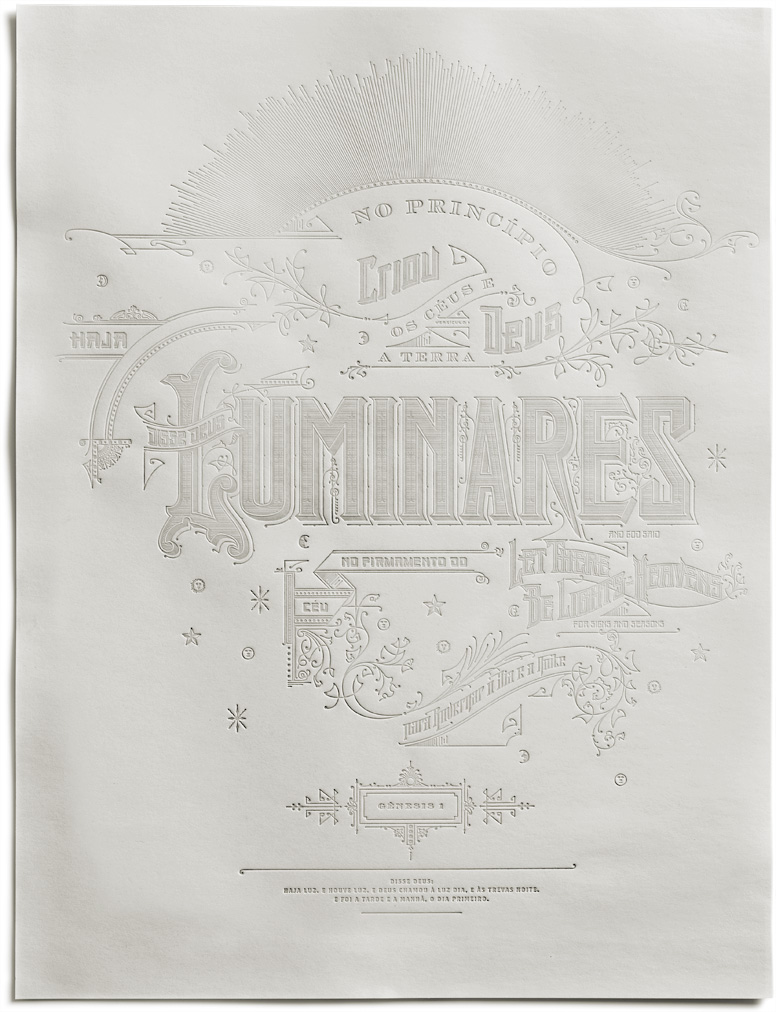
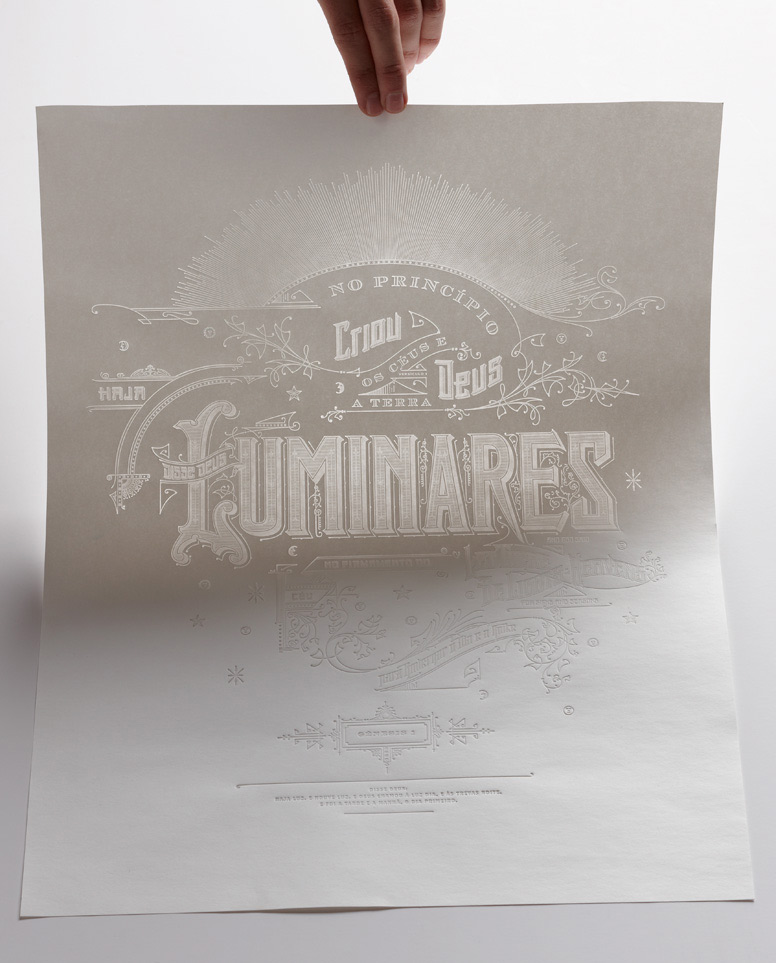
I found this amazing piece on Pinterest, which then led me to the website of Kevin Cantrell, a highly talented and skilled designer, who utilises loads of different techniques to create the most interesting and unusual designs.
On his portfolio he describes how he created this piece:

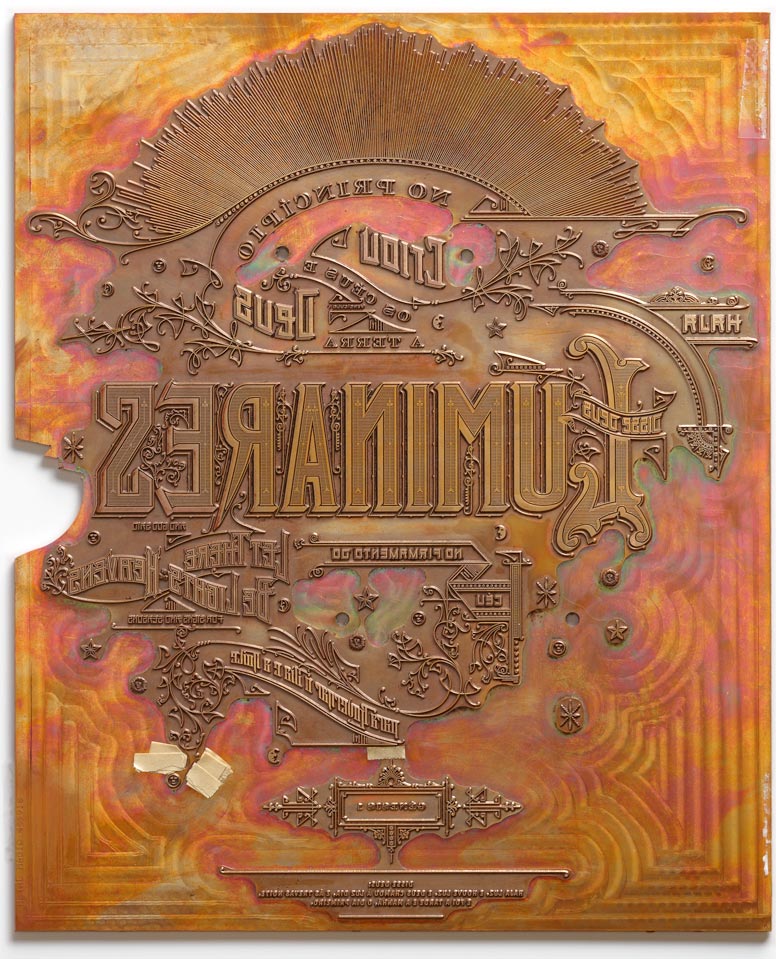
But the magic is in the paper: ' Cordenons Moondream'. Upon even further research I realise that Cordenons is Gruppo Cordenons, luxury paper merchant and that this paper is available to buy - perhaps I could use this in my manual?!
Kevin Cantrell utilises more of the luxury and innovative paper from Cordenons:

Rainbow paper


Blue Metal paper

White blue paper
...
After looking around the website, it seems that they don't ship to the UK at all! But there are lots of UK sites that sell it - and it doesn't come cheap!
I will need to look into this and see if I can achieve hot stamping first before I even look into shipping paper.
No comments:
Post a Comment